Wednesday, May 30, 2018

Lumber Stacks - How To

You can never have too many things to hide behind in a gunfight, and given that Beaverlick Falls has its fair share of under construction buildings I though some Lumber Stacks dotted around the place would be useful.


These are very cheap and easy to make, they can be a bit time consuming but in my opinion are worth the effort.


Basic materials:

Coffee stirrers -  to represent planks or matchsticks to represent posts
Firelighting Splints or thinner coffee stirrers - for the 'bearer' pieces of wood
Wood stain - this can be ink, thinned paint, wood dye or similar to colour the wood
PVA glue - slightly thinned to ease the flow, I use 70/30 PVA/Water
Masking tape - to hold the initial pieces in place
Graph Paper - it's just easier with this, trust me.

Method:

Prepare the wood by cutting it to length and pre-colouring it.  In the example below the planks are 60mm long and the bearers 30mm.  For details of how they were prepared see the 'Preparing Wood' article.

Tape the graph paper to a board (I used an off cut of 12mm mdf) and then add a strip of masking tape glue side up - either glue it in place or use masking tape to hold it down.

Mark the positions of the bearers on the graph paper - I use one in the middle and one about 7mm in from each end, and then stick three bearers in place as shown.


Using a fine tipped bottle or brush, add some PVA to the top of the bearers and then add the first layer of planks.  The graph paper acts as a useful reference for keeping the planks and bearers aligned.


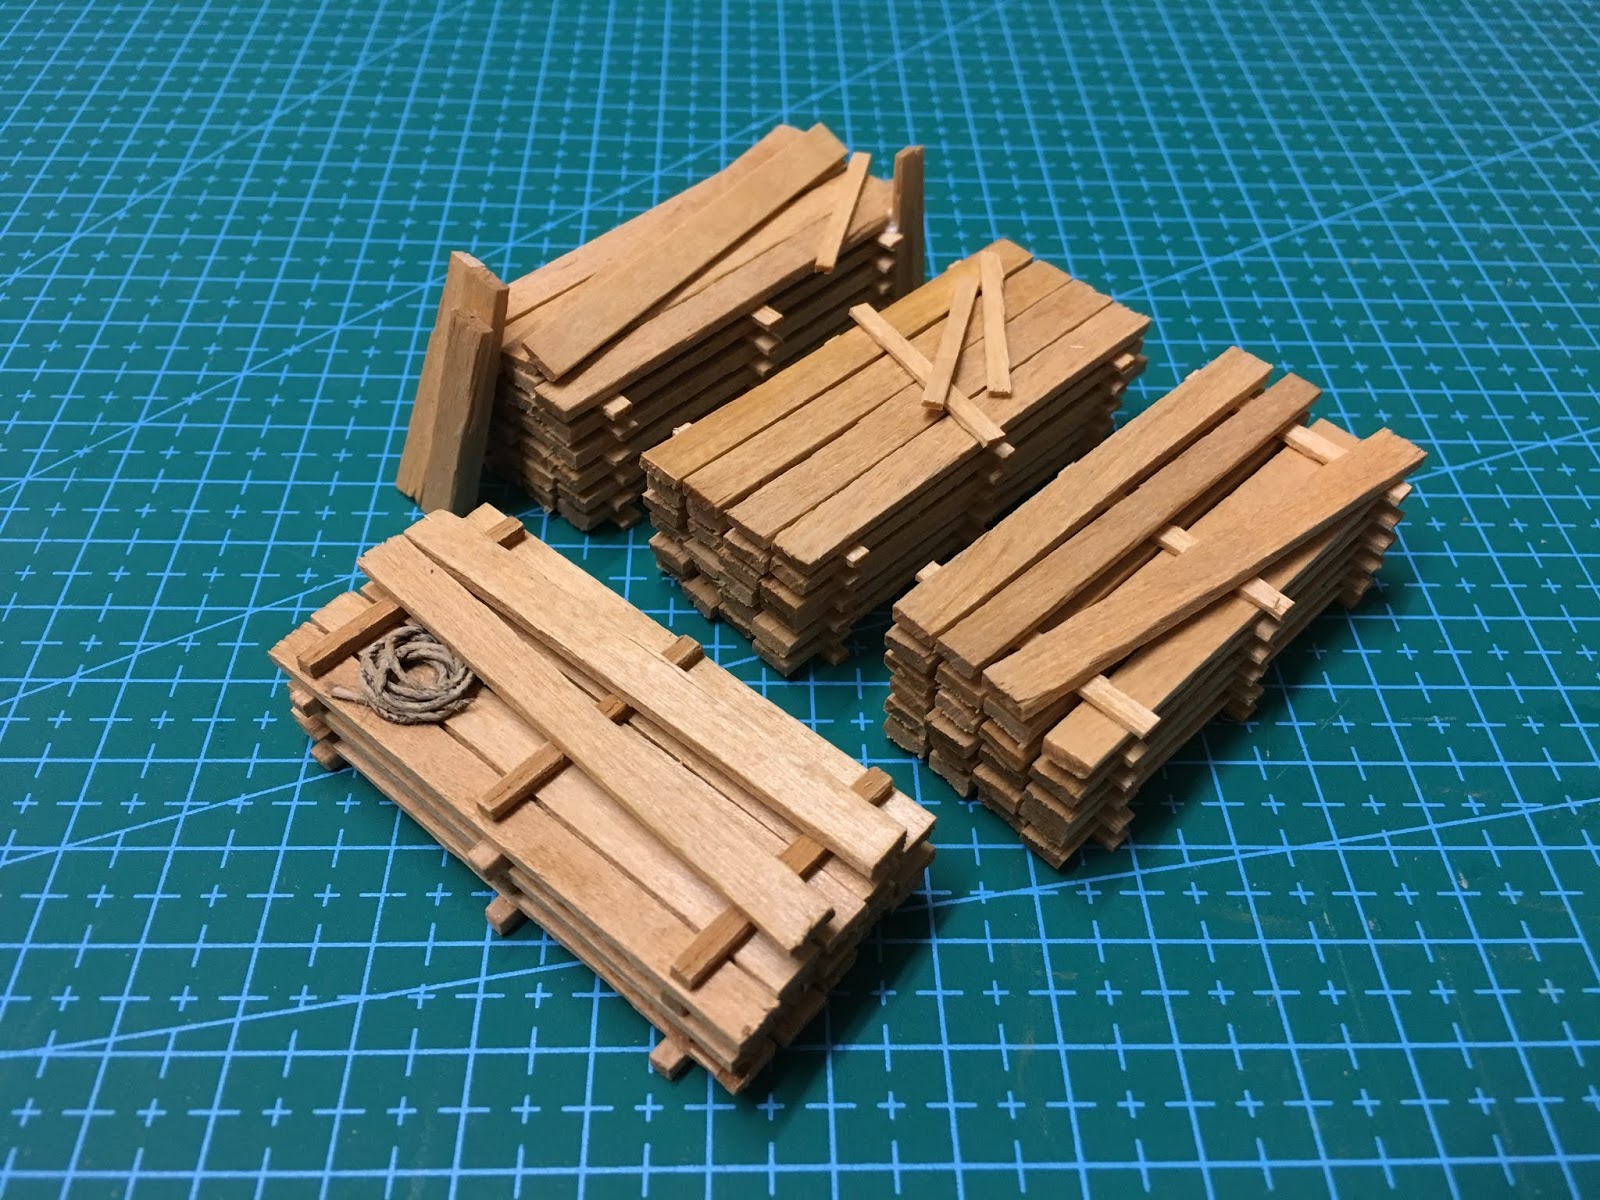
Repeat the process of adding bearers and planks until the lumber pile reaches its required height.
I have found that working on four piles at a time provides enough time for the glue to go tacky between each layer.  If you do one pile at a time be prepared to wait between layers or the pile will start to separate or move.


Once the top layer is added you can clamp the pile to ensure everything bonds, alternatively just put something heavy on top.


To avoid all the lumber piles looking the same I've used differing heights and made 'adjustments' to the top layers on some of the piles.


Preparing wood for scratch building

Lumber in Beaverlick Falls

As Beaverlick Falls is a relatively new town, I wanted the wood to have a new(ish) look rather than grey and weathered.  I tried various methods of colouring the balsa and basswood and have finally settled on a Ronseal matt varnish 'Antique Pine'.

I've also had some small (250ml) pots of emulsion paints mixed up to match the Foundry 'Spearshaft' triad of colours for use on MDF or 3D printed components.  These thin well and can also be mixed in small amounts with the Ronseal varnish to give slight variations in shade.

Pre-colouring the wood
I've found that if unstained wood is used in construction the PVA glue seals the wood and prevents it absorbing wood stain.  As a result joints and any other glued parts become much harder to colour. Pre-colouring the wood not only prevents this issue, but it saves time painting later 


Production Line
As I will need a large quantity of 'planks' for fences, boardwalks, roofs and other sundry items I settled on a mass production technique:

First, I cut firelighting splints, coffee stirrers or strip balsa into lengths using a 'Chopper II' guillotine. This tool (or something similar) is a must have if you're going to produce lots of planks. It simplifies and speeds up the process no end, just set the end stop to the required length and then chop away 3 or 4 strips at a time.  The razor blade will dull after a while so spares are essential.


Next, put the cut wood into a ziplock bag - the bag needs to be large enough for the wood to be shaken freely, don't cram it in - then add a 50:50 mix of varnish/water to the bag, seal it and shake for a few minutes.


MAKE SURE YOU SEAL THE BAG PROPERLY (or be prepared to clean up a mess)

The amount of varnish/water mix will depend on the quantity and porosity of the wood in the bag, you'll need to experiment, but it's not a problem if it's not all absorbed.  The objective is to make sure each bit of wood is covered, so too much liquid is better than not enough.

After a few minutes shaking, take the contents out of the bag, spread them on a kitchen towel and pat them gently to remove any excess liquid - initially many of the 'planks' will be stuck together by the liquid but as you pat they will separate.  Leave them on the kitchen towel in a warm place to dry off.


So a relatively quick and pain free method of creating a large quantity of pre-coloured planks for scratch building.  

For more variation in colour I have added inks and/or paints to the 50:50 mix or in some cases just re-coloured a small batch of planks using the 50:50 to get a darker shade.  


Tuesday, May 29, 2018

General Purpose Building

I made this building to test some techniques and ideas, with no particular use for it in mind.  It's been used as a General Store, a Marshall's Office and a Bank, all with changing the sign on the front.

This build uses 2mm sheet balsa with the usual pencil scribed planking for the walls with a basswood frame added to the top for extra strength.  The doors and windows are 3D prints.


The flooring, which is basswood ship's decking is glued to a piece of 5mm blue foam which is in turn glued to the 2mm thick MDF base.  The fence posts and rails are matchwood.


The fence at the rear is made of firelighting splints, which are thinner than coffee stirrers and cheaper than balsa wood.  All of the components were stained before assembly to avoid the PVA glue from preventing the stain from colouring the wood.


A removable 'tar paper' roof was added from a piece of 2mm MDF with masking tape as the tar paper glued to the MDF with PVA rather than it's own low tack adhesive backing.  Texturing on the base was a mix of brown decorators caulk, PVA and sand which was painted when dry.


 The finished building with its Beaverlick Bank sign


Part Constructed Buildings


As Beaverlick Falls is an expanding town I'm planning to have a number of buildings that are still under construction.   They are reasonably quick to make, add interest to the table and provide less cover than complete buildings which helps with gameplay.

Having tried to build the frameworks out of basswood, I quickly realised that they would take as long as a solid building unless I found an alternative method.  There are MDF kit versions available but as my goal is to scratch build as much as possible I looked at 3D printing.

 Tinkercad is a free to use online CAD program from Autocad.  It's relatively easy to use (compared with other CAD programs) and a few hours spent 'tinkering' will get you a basic understanding. The advantage of using CAD is that once you've done the basic building, it can be amended and reused, either as a whole or in part.

I'm not going to go into details of how to model in Tinkercad or how to 3D print as there are plenty of forums and blogs out there that will tell you how to do both.  I will however recommend those interested in 3D printing take a look at this article Matakish's Tea House.


Plan view of components in Tinkercad.  This is my basic design for a small building that I've used to create a pair of houses under construction.  By printing it flat like this, rather than as a fully 3D assembled house I have avoided a lot of clean up and it's given me more flexibility for future builds, for example a building that's got a side still to be built.


Components parts printed ready to be assembled . . .


. . . and the assembled components. The roof lifts off for ease of access.


Assembled and painted building with an additional floor made of balsa sheet with pencil line floorboards. This will be added to a base board with lumber piles and other small items at a later date.


Land Registry Shack

This wooden fronted tent building is the first building I made for Beaverlick Falls.  The construction is a basswood frame with balsa 'boards'.  The boardwalk front is made of coffee stirrers and the door and frame are balsa.  The floor is a sheet of balsa with pencilled floorboards that is atop a 5mm blue foam base.  I use the foam to give dimensional stability and reduce the chance of the base warping.


View from the back showing the construction of the roof former before adding the linen 'canvas'.  Green and yellow card is old supermarket price signage like art board (but free) and the grey trusses are PLA 3D prints.  The roof is removable and just sits on top of the framework.


Prepping the linen for the tent.  I add a small hem to each edge using a fold and PVA so that the width of the strip is the same as the length of the roof.  The linen is stuck to the frame using PVA which is allowed to dry before more watered down PVA is brushed onto the rest of the roof to cause it to sag and stiffen.  On this building I stuck the sides down at the same time as the roof and then added the back piece of canvas so that the roof was held in place by the material


Once the PVA had dried and the canvas set I took a scalpel and cut through the material between the wooden frame and the bottom of the roof base to separate the two and have a lift off roof.


The finished construction just requiring detailing. 


The Land Agent's Shack.  The sign was printed on paper and mounted on art board before being weathered. I fitted a magnet in the wooden front of the building and steel paper to the back of the sign so it can be changed if needed.  The wanted posters are from the internet, printed on paper and stained with coffee for an aged look.  Hinge and lock are paper and bits of plastic.


The Lumber Yard Office

The Lumber Yard Office will become part of a larger piece later on, but for now it's a stand alone building.   This was my first attempt at balsa over a 3D printed framework and it's also the first working door on a BLF building.

The building framework was designed on Tinkercad and printed in PLA on a 3D filament printer.  A separate set of roof trusses (not shown in the picture) were also printed and slot inside the two end gables.


The sides and ends were glued together using engineer's blacks to ensure squareness.  Figure is a Knuckleduster miniatures storekeeper.


Skipped a few steps to get to here but the balsa sides were made of 1mm think balsa sheets with plank lines drawn on using a soft lead pencil.  The distance between the lines is 5mm.  All the wood was stained before assembly to ensure the wood glue doesn't stop the wood from taking the stain.

The balsa was fixed to the frame using PVA glue and the window and door openings were cut out once the glue had dried.  The frame is used as a template so cutting the openings is relatively easy.  The door and windows are 3D printed.

The roof is art board cut to shape and PVA'd to the 3D printed former.  The surface was painted with dark brown craft paint to stop the board showing through the tiles at a later stage. Strip balsa was then added around the edges as eaves before the addition of tiles.


Tiles were added using strips of laser cut shingles from Oshiro Model Terrain which were then dry brushed using various shades of brown.  I'm avoiding using to much grey on the wood as most of the buildings in BLF represent new buildings only a few years old.


The door was hinged using two small strips of linen that were glued to the frame and door edge.  


The door can be now be opened and closed which is useful in skirmish games


Signage was made in Adobe Fireworks and printed on photo paper.  Door frame and window sills added using 1mm square balsa.  The whole building was given a dry brush with a light sand colour to emphasise the edges and individual tiles were stained with inks and thinned acrylic to give the roof some interest.


 Finished Lumber Yard Office (although it still needs a door handle)


Beaverlick Falls - An Introduction

I've always been interested in Old West 'Gunfight' games but like a lot of gamers I've butterflied between projects, seldom completing any, and my original old west setup (minimal as it was) ended up on a convention bring and buy some years back.

In October 2017 I played a most enjoyable western gunfight set in the fictitious town of McGinty's Crossing using the Fistful of Lead rules and my interest in the Old West was rekindled. The result of my renewed interest is my Beaverlick Falls project.

Beaverlick Falls is my take on a theme - it's not intended to be historically accurate, although I'm basing models on prototypes where possible, so it's got as much Hollywood as it's got History.  In terms of setting and back story, I see Beaverlick as a town that's grown from a few hunting lodges used by fur trappers to a small and expanding frontier town.  It will have a rail link and a riverboat landing at some point and local industry includes mining (The Windy Butte Mining Company) and logging.  Ranchers and cattle will feature too.

I've deliberately not picked a specific location as I want the freedom to model terrain and buildings that I like rather than those that would be geographically appropriate, however it turns out there's a real Beaver Lick town in Kentucky.  Any resemblance between the two is pure coincidence.

Where possible I'm building the structures from scratch using a mix of balsa, basswood and other wood for the wood (unsurprisingly) and tents are made from linen over card or 3D printed frames.  Signs for the most part are designed in Adobe Fireworks and printed on card, paper or transfer material.  Where practical I'll produce some 'how to' posts to explain what I've done.

The blog is a record of my efforts and an attempt to keep the project on track rather thango the way of the proverbial dodo.  I'll post the work to date to start the blog off and then I'll add items as I make them and time permits.  I hope you find it interesting.

Note:
BLF = Beaverlick Falls.  Rather than constantly typing Beaverlick Falls, I've used BLF as a shorthand reference.