Tuesday, June 12, 2018

A Tent of Ill Repute

No WIP pictures on this post, this is one of the buildings I'd finished before starting the blog so I'm just adding it for completeness.

The Brothel is based (loosely) on the one in the excellent Hell on Wheels series, which was one of my inspirations for creating BLF.


The brothel is a tent with plank walls and as one of the first buildings I made it has a wooden framework, unlike the newer builds that are built around a 3D printed frame.  The roof was printed as a single 3D piece, which while functional was a pain in the proverbial posterior to clean up, hence my switch to individually printed roof trusses.


There's a well appointed bathing area to the side of the establishment to ensure that the dirtier clientele are bathed before partaking of the pleasures.  The baths are 3D prints and the sign is printed on card.


I've made the brothel sign removable so that the building can be used for less controversial activity should the need arise.


Monday, June 11, 2018

The Lumber Yard

Every expanding town needs a Lumber Yard and Beaverlick Falls is no exception.


I made the Lumber Yard Office as a single building, so all that was required for this build was a simple fence and yard arrangement.  Using the fences I'd built earlier I added them to the 2mm thick mdf base that had been shaped and sanded.  My preference is to have the bases taper down to nothing so that they blend in with the tabletop and are less obvious than square edges.


I decide to add a gate to the back of the yard to give an additional entry point (or escape route, depending on the situation.  The gate is a trimmed bit of fence with some battens added and it's hinged in the same way as the office door, with small strips of materal.


I chose a 'corner' entrance, cutting the base at 45 degrees, for no particular reason, other than I thought it would make the piece more visually appealing.


The height of the sign was going to make storage a problem, so I've made it removable.

I drilled a 2mm hole into the bottom of the posts to 25mm depth and then cut off c.8mm from the bottom of the post, making sure I marked the posts and front face.  This will make sure the pins and posts line up perfectly without needing to drill separate parts with complicated measurements

I inserted a 2mm brass rod into the hole and dapped the bottom of the rod with black paint. While the paint was wet I lined up the post with the fence so that the wet paint marked the baseboard with where I needed to drill the hole for the brass rod.


the 8mm blocks cut from the bottom of the posts were slid over their respective brass rod pins and glued in place - this strengthens the joins significantly. It's important to get the correct block and pin paired up otherwise the posts won't fit on the pins neatly and the join will be obvious.  Using this method means it doesn't matter if the hole isn't perfectly central to the post.


Some more photos of the finished Lumber Yard.  The lumber stacks are loose so that the configuration can be changed if required.  It also means that the yard can be used for another purpose with just a simple change of signage.


Thursday, June 7, 2018

Making Fences

Quick 'How To' on my method for making fences, there are other ways of doing it I'm sure, but this is the way I've settled on.

As there will be a reasonable amount of fences in Beaverlick Falls, I've started to make a stock of long fence length which I can cut down to fit a particular building or terrain piece when needed.

Making the fences

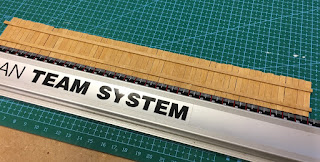
Starting with a pile of prepared timber, line up the bottom fence panels against a straight edge. I do this on a cutting mat as it's easier to check the vertical alignment; try and avoid the panels leaning left or right unless you're going for a ramshackle look.


Once you have enough panels lined up, add a panel to either end that has markings to show where the horizontal rails are going to go - I add a couple of marked panels in the middle of the fence too so that I can ensure the rails are correctly spaced.


Glue the back of the rails along the entire length, then stick them to the fence panels using the pencil marks as guides. It's important not to move the rails one stuck down as this will cause the panels to lean.  I apply light pressure to the centre of the rail and then work outwards towards each of the ends saving made sure before hand that the rail is lined up with the guides.


Once the rails are stuck add a flat heavy weight ( I use a thick piece of mfd with a weight on top) to the top to ensure the rails are firmly stuck to the panels.


Once the glue is dry that's it.  Posts are added at a later stage when the lengths of fence are added to bases of houses etc.


Sunday, June 3, 2018

Part Constructed Buildings II

Finished the first pair of part constructed buildings for Beaverlick Falls.

I've based them on 2mm mdf that's been textured, flocked and 'planted'.  I won't go into detail on the basing as I'll most likely do a post on that later.  Lumber stacks were added and for variety between the two buildings I added some planking to one to give the impression of ongoing construction.